

The Complete Guide to Patio Door Installation: Transform Your Living Space
Published by Glass Mirror Pro | Expert Glass & Mirror Solutions
A new patio door does more than just provide an exit to your backyard; it acts as a stunning architectural focal point that floods your home with natural light, improves energy efficiency, and bridges the gap between your indoor and outdoor living spaces. Whether you are upgrading a drafty, outdated sliding door or carving out a brand new opening in your wall, a proper patio door installation is the key to ensuring long-lasting performance, security, and beauty for your home.
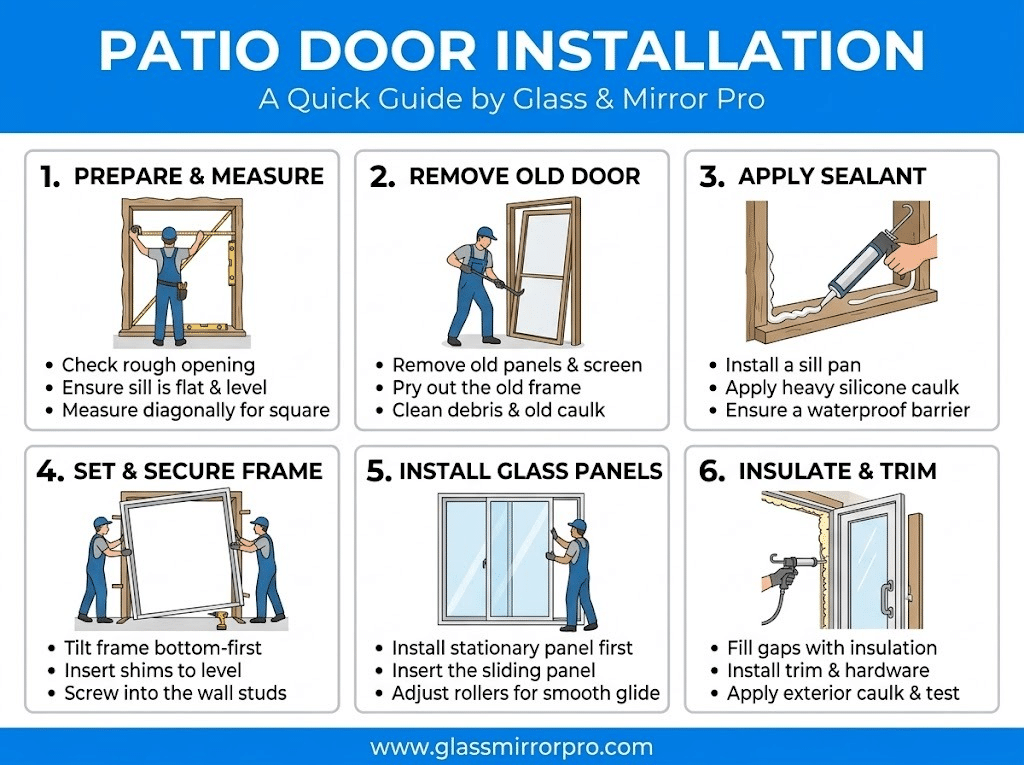
Visual Guide: The Installation Process
1. Selecting the Perfect Patio Door
Before installation begins, selecting the right type of door is crucial. The most common styles are sliding glass doors, French doors, and bi-fold systems. Sliding doors are incredible space-savers, while French doors offer a classic, elegant aesthetic. It is also vital to consider the framing material—such as vinyl, fiberglass, or aluminum—and the glass package. We highly recommend looking for insulated, low-E glass options that meet the latest Energy Star® guidelines to keep your home comfortable year-round and drastically lower your utility bills.
2. Preparing the Rough Opening
A flawless installation starts with pristine preparation. If replacing an old door, the existing unit must be carefully removed without damaging the surrounding drywall or exterior siding. Once removed, the “rough opening” (the exposed wooden framing) is thoroughly inspected. Any signs of water damage, wood rot, or structural weakness must be repaired at this stage. The opening must be perfectly square and level; even a fraction of an inch off can cause the new door to stick, drag, or fail to lock properly.
3. Flashing, Setting, and Securing
Protecting your home from the elements is the most critical part of installation. Flexible waterproof flashing tape is applied to the sill and framing to prevent water intrusion. Next, the new door frame is dry-fitted, leveled, and plumbed using shims. Once perfectly aligned, it is securely fastened into the structural studs. To ensure maximum thermal performance, the gaps between the new door frame and the wall are filled with low-expansion foam insulation, a practice recommended by the National Fenestration Rating Council (NFRC) for optimal energy efficiency.
4. Sealing and Final Adjustments
The installation isn’t complete when the screws go in. High-quality exterior caulk is applied around the perimeter of the door to create an airtight, watertight seal. On the inside, interior trim or casing is installed to cover the rough opening and provide a polished, finished look. Finally, the door panels are inserted, and the rollers, tracks, and locking mechanisms are meticulously adjusted to ensure the door glides open smoothly with just the push of a finger and locks securely to keep your family safe.
Trust the Experts at Glass Mirror Pro
While DIY projects can be rewarding, patio door installation is a heavy, complex, and high-stakes job. Improper installation can lead to massive water damage, voided warranties, and compromised home security. By trusting a professional team, you guarantee a perfect fit, a weatherproof seal, and absolute peace of mind. At Glass Mirror Pro, we handle everything from exact measurements to flawless execution, ensuring your new door looks and functions beautifully for decades.




Leave a comment