

How to Replace a Window Screen: A Simple Step-by-Step DIY Guide
Published by Glass Mirror Pro | Expert Glass & Mirror Solutions
A torn or sagging window screen is more than just an eyesore; it is an open invitation for mosquitoes, flies, and other pests to invade your home. Furthermore, damaged screens prevent you from taking advantage of cost-free, refreshing natural ventilation during the cooler months. Fortunately, replacing a window screen is one of the easiest, most rewarding DIY projects a homeowner can tackle. You don’t need to replace the entire aluminum frame—you simply need to replace the mesh. In this guide, we will walk you through exactly how to do it in under 30 minutes.
Visual Breakdown: Screen Replacement
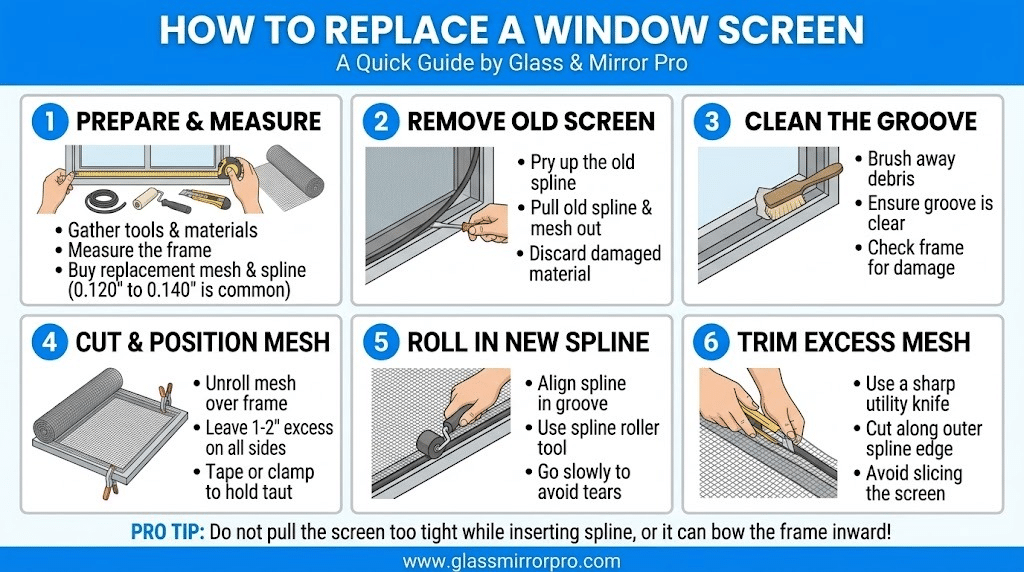
1. Gather Your Tools and Materials
Before pulling out your screen frame, make sure you have the right materials on hand. To maintain proper airflow and keep pests out—practices highly recommended by the U.S. Department of Energy for natural ventilation—you will need high-quality replacement mesh. You will need a roll of fiberglass or aluminum screen mesh, a new rubber “spline” (the flexible cord that holds the screen in the frame), a spline roller tool, a flathead screwdriver, and a sharp utility knife. Tip: Take a small piece of your old spline to the hardware store to ensure you buy the exact same diameter for a snug fit.
2. Remove the Old Screen and Spline
Pop the screen frame out of your window and lay it flat on a large, stable work surface. Locate the rubber spline sitting inside the groove around the perimeter of the frame. Use the tip of your flathead screwdriver to carefully dig under one end of the spline and pry it up. Once you have a piece loose, simply grab it with your fingers and pull it out all the way around the frame. Discard the old spline and the torn mesh. Take this opportunity to wipe down the aluminum frame and clear out any dirt or dead bugs from the groove.
3. Cut and Position the New Screen
Roll out your new screen mesh over the clean aluminum frame. You want to make sure the mesh completely covers the frame, leaving about 2 inches of excess material hanging over every side. Use your utility knife to cut the mesh from the roll. Do not worry about making the edges perfectly straight at this stage; you will trim it down completely later. Having this excess material gives you something to hold onto and ensures the mesh remains taut as you begin to lock it into place.
4. Push in the Spline (The Crucial Step)
This is where the magic happens. Your spline roller has two wheels: one convex (rounded) and one concave (grooved). First, use the convex wheel to gently press the screen mesh down into the frame’s groove all the way around. Next, grab your new rubber spline. Starting in a corner, press the spline over the mesh and into the groove. Switch to the concave wheel of your roller to press the spline firmly down into the track. Keep the mesh reasonably tight with your free hand as you roll the spline across all four sides of the frame.
Time for a Complete Window Upgrade?
To finish your screen, carefully run your utility knife along the outer edge of the spline to trim away the excess mesh, and pop the frame back into your window! It’s that easy. However, if you notice during this process that the actual glass in your window is cracked, foggy, or drafty, fixing the screen won’t be enough. For professional, energy-efficient window glass replacement tailored to your exact frame, trust the experts at Glass Mirror Pro.



Leave a comment